I’ve written about this modification before, but the question came up recently in a group, and I was surprised how few people know about onlysheets by Andrew. Now, at the time of writing this, it’s $30, but I think that the best value is actually https://bettersheets.co/, his lifetime deal on all of his Google Sheet Wizardry.
$30 and you can securely share and manage your access to your documents, drive folders and files with automation to boot, out of the box it’s pretty impressive. It works with Stripe, Gumroad, Zapier and Pabbly but you should all know by now, for me it has to integrate with FlowMattic (the same method here should work for Ottokit (suretriggers) too.
So, the rest of this article, I am going to make some assumptions: you’ve already given Andrew your hard-earned cash, you want to sell some access, you have a Google account or a Workspace account, and you have a WordPress instance with Flowmatic ready to go.
I am going to limit the amount of Andrew’s code I share here to make it as fair to him as I can, but I do have to share some to show you how to integrate the Flowmattic.
So open OnlySheets and navigate to extensions and Apps Script, you now want to edit the OnlySheets.gs file, and you are going to make a change, replace the below code with the code below.
At the very top of the file
function doPost(e) {
  var pay = SpreadsheetApp.getActiveSpreadsheet().getSheetByName("Settings").getRange("B2").getValue()
  // purchase and cancellations
  if(pay == "Stripe"){ stripeGo(e) }
  //only purchases
  if (pay == "Gumroad"){ gumroadGo(e) }
  //purchases and cancellations
  if (pay == "Zapier"){ zapierGo(e) }
  if (pay == "Pabbly"){ pabblyGo(e) }
}With the following
function doPost(e) {
  var pay = SpreadsheetApp.getActiveSpreadsheet().getSheetByName("Settings").getRange("B2").getValue()
  // purchase and cancellations
  if(pay == "Stripe"){ stripeGo(e) }
  //only purchases
  if (pay == "Gumroad"){ gumroadGo(e) }
  //purchases and cancellations
  if (pay == "Zapier"){ zapierGo(e) }
  if (pay == "Pabbly"){ pabblyGo(e) }
  if (pay == "FlowMattic"){ flowGo(e) }
}
function flowGo(e){
  try{
    var ss = SpreadsheetApp.getActiveSpreadsheet();
    var log = ss.getSheetByName("LOG");
    var lastRow = log.getLastRow();
    var event = JSON.parse(e.postData.contents) // Parse the array
    var email = event.email;
    var permalink = event.permalink;
    var hookType = event.hooktype;
    onlySheets(email,permalink,hookType)
    return HtmlService.createHtmlOutput(200);
}catch(err){
  log.getRange(lastRow + 1, 3).setValue(event);
  log.getRange(lastRow + 1, 7).setValue(err);}
}That is all the modification necessary to the code we now need to manually add the option for a Flowmattic purchase option as shown below;

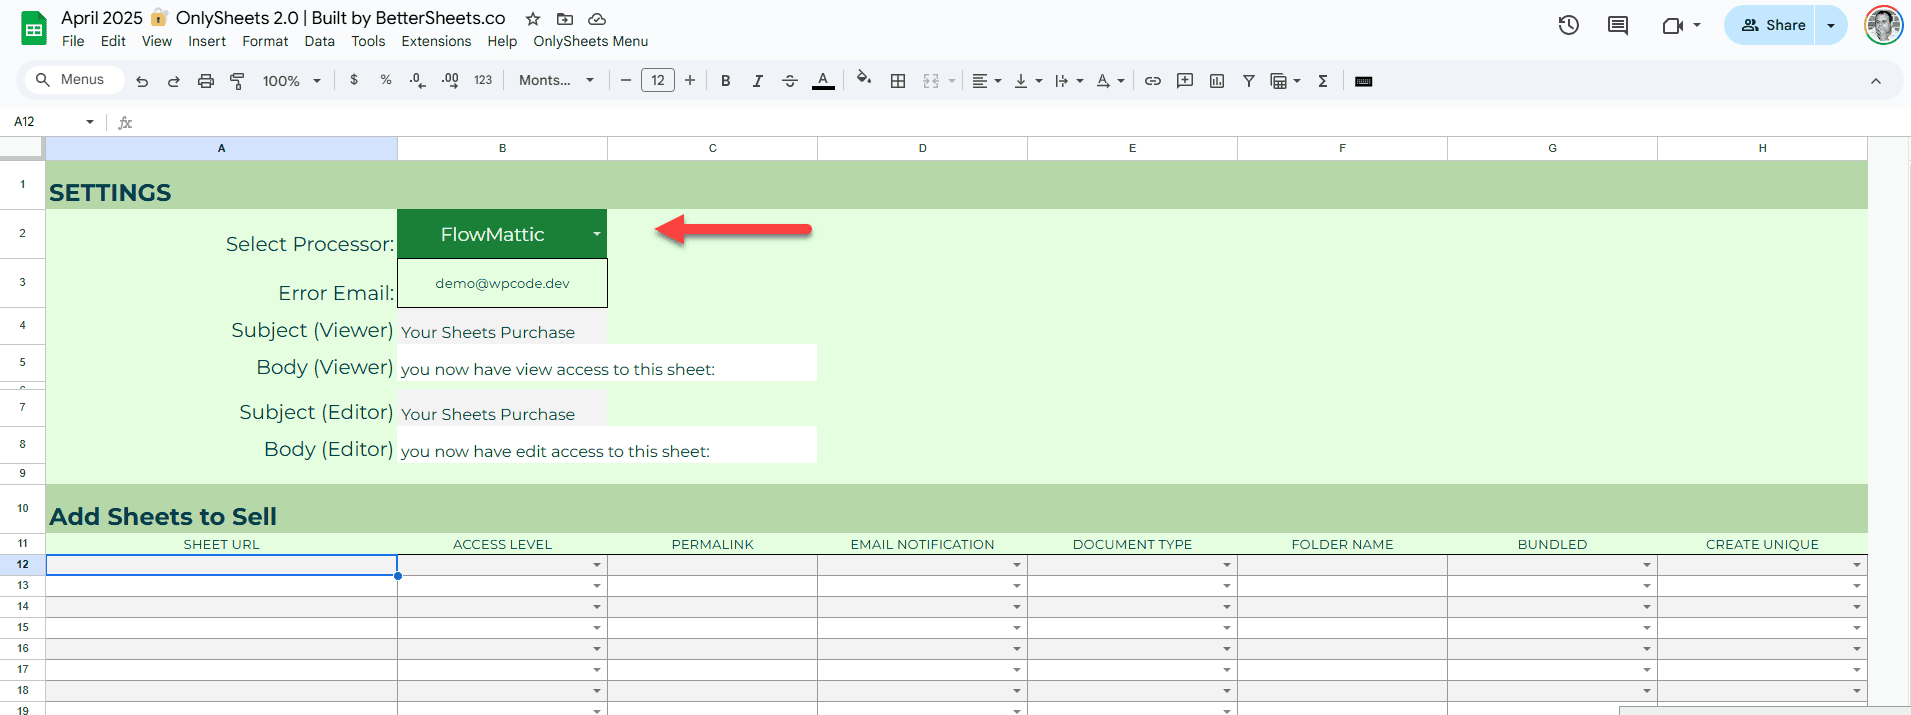
Step 1: We need to edit the select processor list

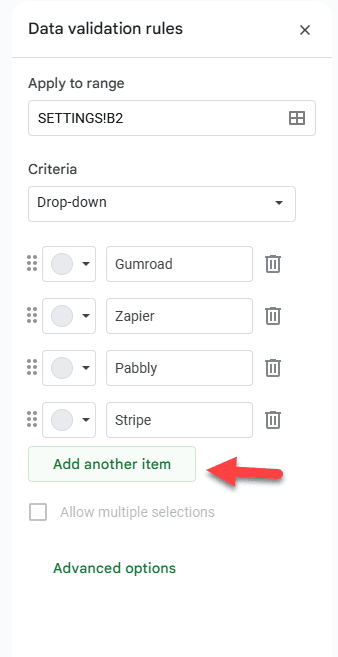
Step 2: We need to add a new item to the drop-down

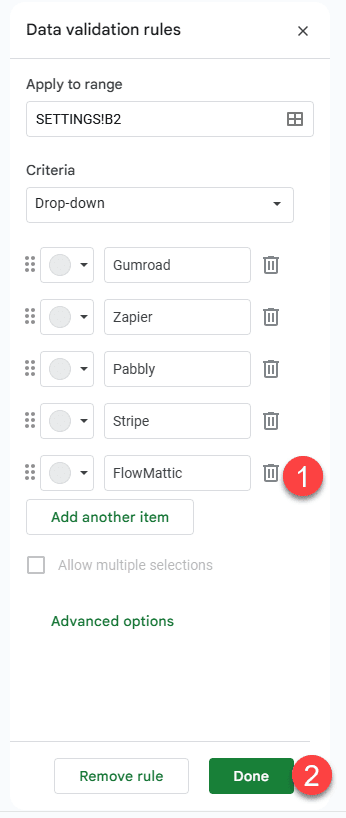
Step 3: We add FlowMattic as shown below

Now I am not going to talk setup and what Only Sheets can do, there is someone who can do such a better job, and that’s Andrew and this Loom Video
So now we have the code we need to set flowmattic up to work with this, in my example we will be doing a lead magnet so no payments details but because we are using flowmattic your triggers are endless and your options too, maybe you want to use the new email designer to send your email access rather than better sheets for example
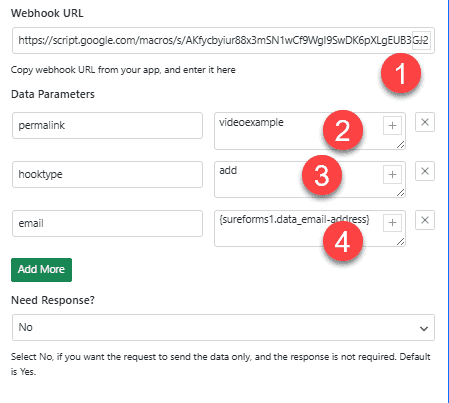
Setting up our access with Flowmattic is really simple. Now that we have made our modifications, the image below shows the required settings, and we will discuss them in more depth below the image.

- This is our deployed scripts hook address
- Is the name we give in the permalink URL
- This is what we want to do in this case: to add
- This is the email address you want to give access to.
It really is that simple the video below shows you a simple lead magnet idea using flowmattic and simply sheet
